This is an updated version of my 2024 PyTorch Windows environment config tutorial. The old 9-step process has been simplified to 5 steps — no more manual CUDA Toolkit, cuDNN, or environment variable configuration.
-
-
2024-01-23 Update: Add CPU environment PyTorch installation step
This tutorial will go through how to config the PyTorch(deep learning) environment with local CPU/GPU(s).
Sometimes creating a new deep learning environment could be annoying, especially the first time. This tutorial is like installing a driver and enables GPU for calculation in our model training process.
Table of Contents
- Hardware Requirements
- Software Requirements
- Step by step configuration on Windows 11
-
Install PyTorch on the CPU environment
Hardware Requirements
- NVIDIA GPU - CUDA-capable
- Compatible Motherboard (PCIe slot accommodate)
- Minimum 8GB RAM
- Enough Disk Space
Software Requirements that we will go through in this tutorial
- Windows 10/11 or Windows Server 2022/2019 (not in this tutorial)
- NVIDIA GPU Drivers (gameing driver)
- CUDA Toolkit - Provides libraries, APIs, and compilers like nvcc to enable GPU acceleration.
- cuDNN – The GPU-accelerated library for deep learning.
- Anaconda (recommend) - To manage Python packages and environments.
- PyTorch/TensorFlow – The deep learning framework we aim to install and use with CUDA/GPUs.
Step by step configuration on Windows 11
Step 1 Check GPU Series
Go to windows Setting > System > Display
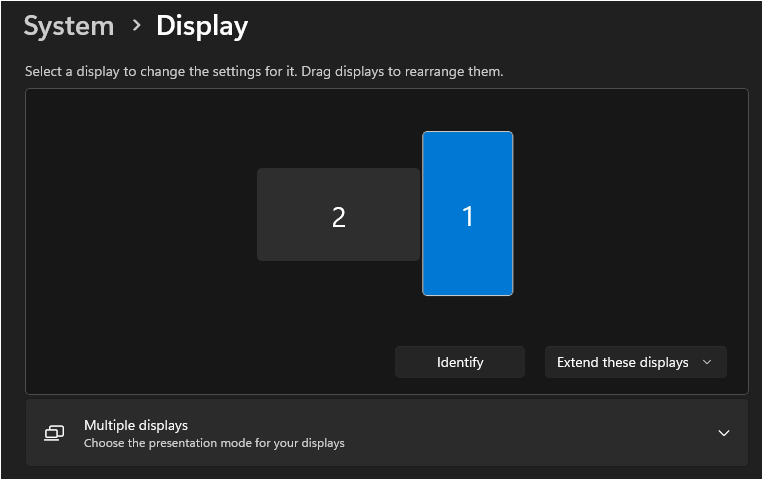
Then click on Advanced display
 Here, we can find the current GPU series in display information section.
Step 2 Install NVIDIA GPU Driver
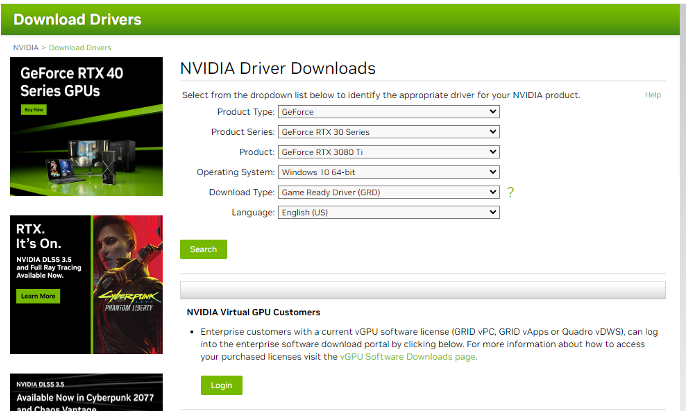
After we know our gpu series, the next step is to install GPU Driver. Please ignore this section if you already installed GPU driver.
Go to this website and download the driver for your GPU.
Step 3 Install CUDA Toolkit
This step will install the essential CUDA developer toolkit.
Before installing the CUDA driver, I suggest you check PyTorch webste, and make sure your CUDA version could be supported by the Pytorch version that you want to download (I would recommend downloading the newest stable version):
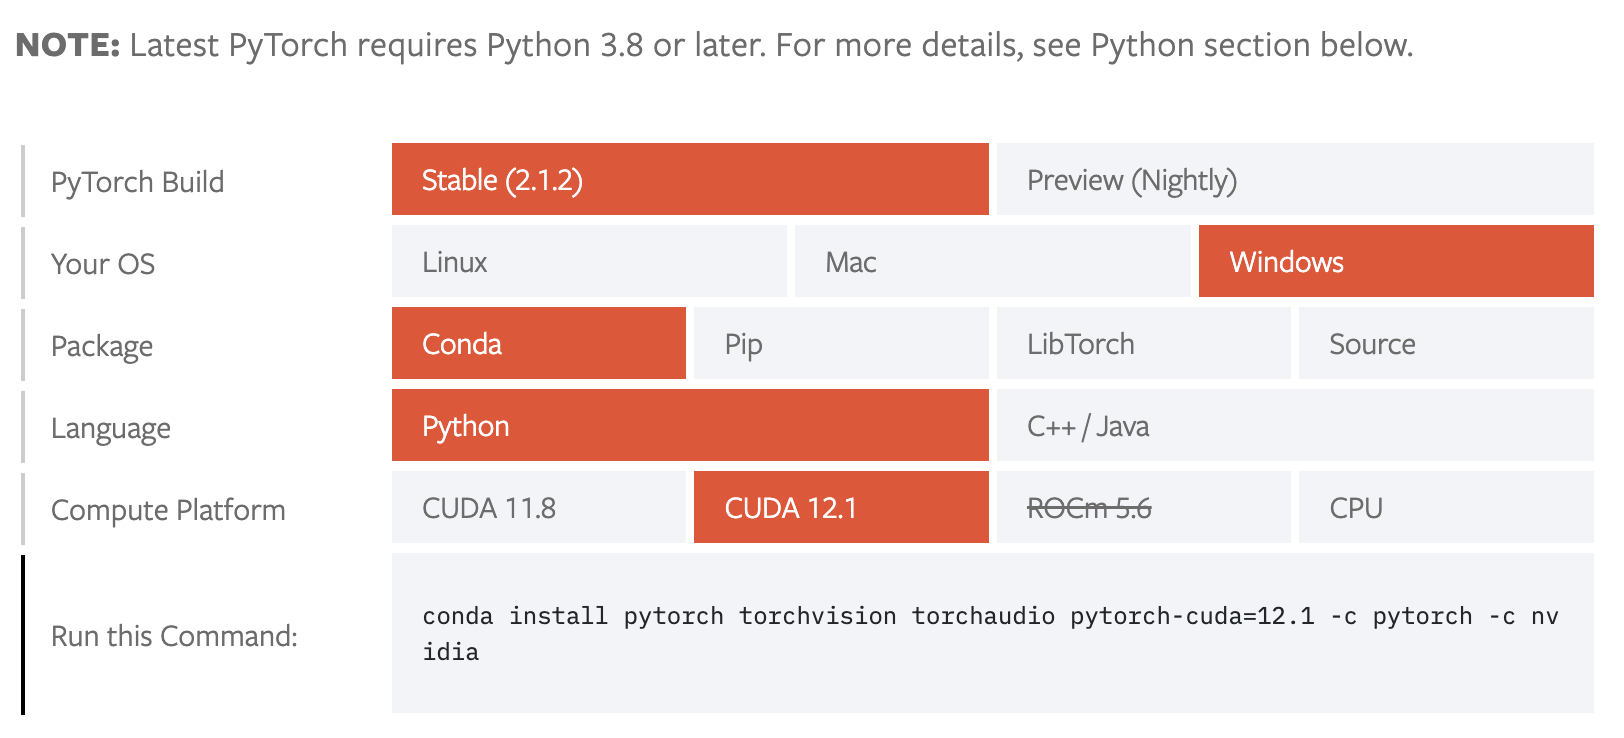
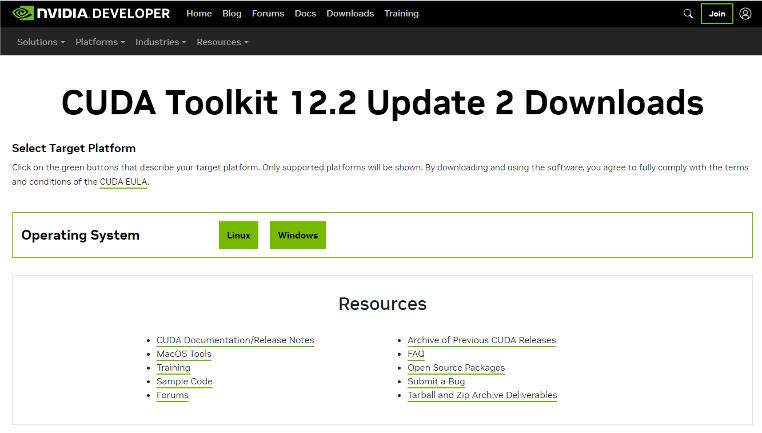
Go to Nvidia Develop site and download the latest stable version that matches your Operating System, GPU model, and Python version you plan to use (Python 3.x recommended).
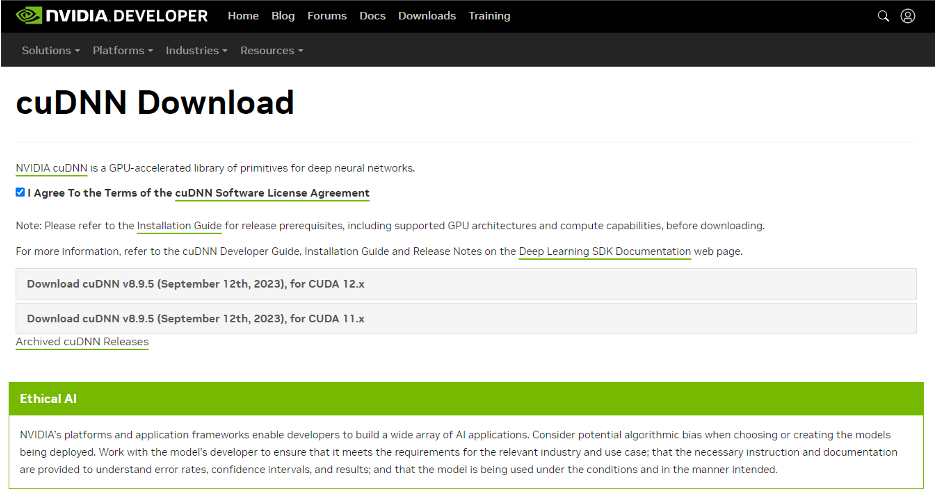
Step 4 Install cuDNN Library
Then we need to install cuDNN Library from https://developer.nvidia.com/cudnn to boost performance for deep neural networks. CuDNN library is an accelerated framework for converting other programming languages into CUDA C language (Nvidia GPU’s ‘native language’). In this case, we are using Python so this framework is important. Download cuDNN from here. Please note that you have to register a nvidia developer account to access this package.
Important: make sure to download the version that matches the CUDA toolkits version.
Unzip the downloaded package and copy the contents of bin, include, and lib to the respective directory paths where CUDA is installed on your machine (always remeber to back up your directory before making changes). Example CUDA folder which you want to place the cnDNN package:
C:\Program Files\NVIDIA GPU Computing Toolkit\CUDA\[your CUDA version]\bin
C:\Program Files\NVIDIA GPU Computing Toolkit\CUDA\[your CUDA version]\include
C:\Program Files\NVIDIA GPU Computing Toolkit\CUDA\[your CUDA version]\lib
Step 5 Configure Environment Variables
Run prompt and type
sysdm.cplto open System Properties. Then go to advance tab and click on the Environment Variables. Under System Variables add the following (change dir based on your installation):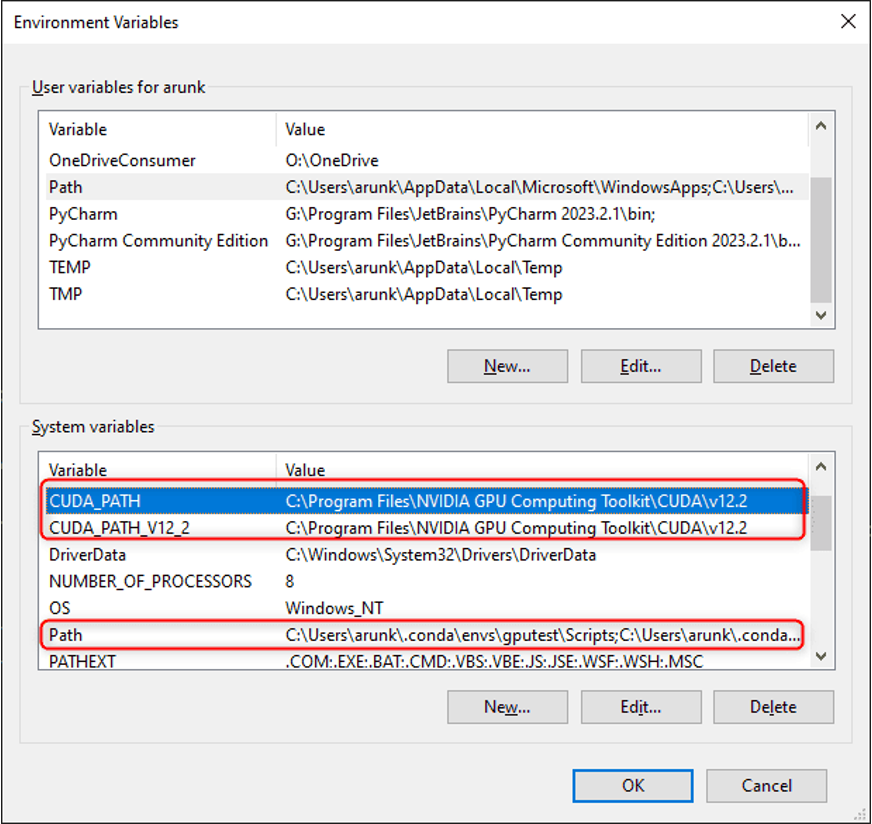 PATH:
PATH:C:\Program Files\NVIDIA GPU Computing Toolkit\CUDA\v12.2\bin C:\Program Files\NVIDIA GPU Computing Toolkit\CUDA\v12.2\libnvvp C:\Program Files (x86)\NVIDIA Corporation\PhysX\Common C:\Program Files\NVIDIA Corporation\Nsight Compute 2023.2.2\ C:\Program Files\NVIDIA Corporation\NVIDIA NvDLISRCUDA_PATH:
C:\Program Files\NVIDIA GPU Computing Toolkit\CUDA\v12.2CUDA_PATH_V12_2:
C:\Program Files\NVIDIA GPU Computing Toolkit\CUDA\v12.2Some command to check if the driver is correctly installed
- check the Runtime API version:
nvcc -–version - check the Driver API version:
nvidia-smi - check if the GPU is recognized:
nvidia-smi --list-gpus
Step 6 Install Anaconda/Python
You can choose to download Python from anaconda or python.org. Anaconda provides a more friendly GUI to create different package environments.
If you don’t know which Python version to install, I would recommend also checking the PyTorch webste and making sure the specific torch version supports the Python version.
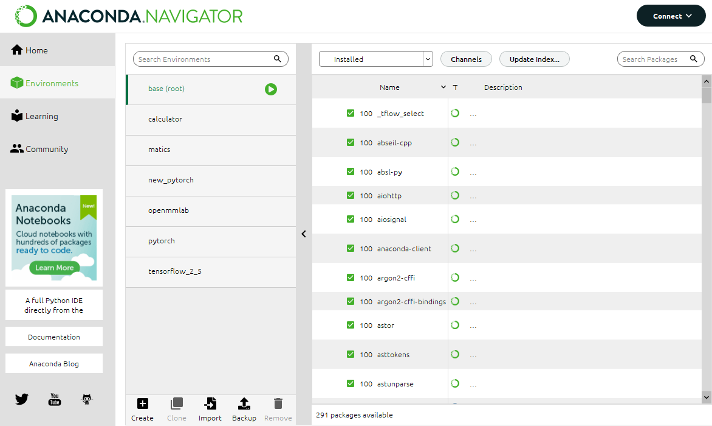
Step 7 Install PyTorch
Install PyTorch. The website will generate an installation command based on your system details. Please do not directly install the default version from conda or pip because sometimes it will install the CPU version and is not compatible with your GPU. You can copy and paste the generated command to the Anaconda terminal or your activated Python Venv terminal.
Here is an example of where to paste the command on Anaconda GUI:

Just make sure the channel is the one you selected for the PyTorch environment. Then click on the circled button and input the generated command, for example:
conda install pytorch torchvision torchaudio pytorch-cuda=12.1 -c pytorch -c nvidiaStep 8 Install IDE (Optional)
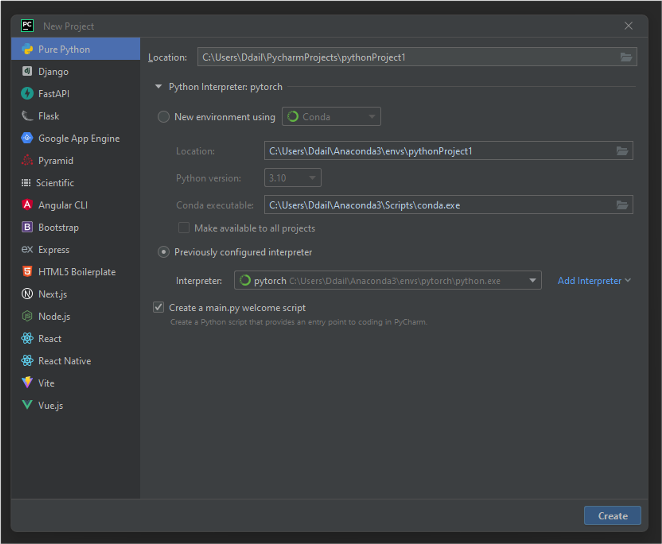
Students can install PyCharm for free. You can use your prebuilt Python virtual environment(from Step 6 and Step 7) with most available IDEs. When config a new project, the IDE could automatically detect your environment and use it as an interpreter:
Step 9 Confirming GPU Availability in PyTorch
After creating a new project, you can run this code to test if your GPU is available and ready to use:
import torch

# Check for GPU availability
device = torch.device("cuda" if torch.cuda.is_available() else "cpu")
print(f"Using {device} device")
Important: Make sure the Python interpreter in Run Configuration is the same as your conda environment
If the output displays
Using cuda deviceas shown in the example screenshot below, this indicates that your PyTorch environment is successfully utilizing the GPU. Congratulations on configuring your PyTorch environment correctly!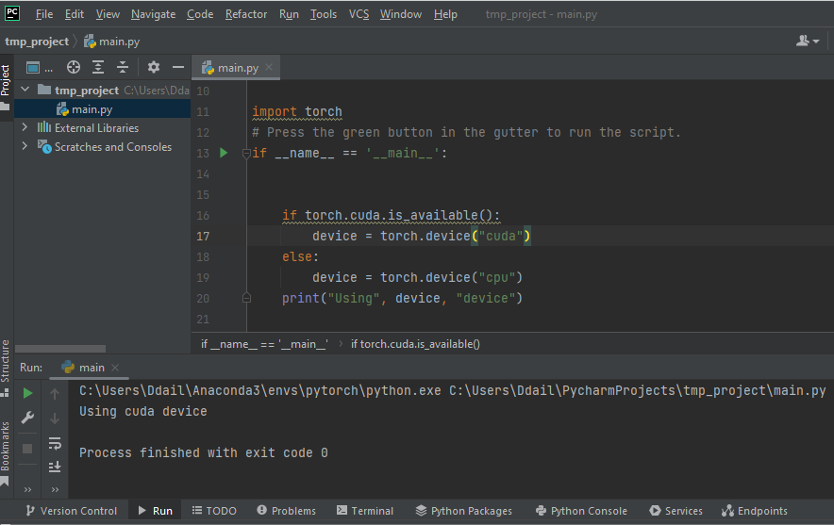
Install PyTorch on CPU environment
Installing PyTorch on the CPU environment is easier than GPU. You can skip the first steps and directly install Anaconda/Python, then install Pytorch and IDE. I would recommend using Anaconda for more convenient environment management. The only difference is to set the Compute Platform to CPU in step 7.
Please feel free to leave a comment below if you have any questions, suggestions, or feedback. Your input is greatly appreciated!